How To Patch and Texture Drywall
Drywall, a common material used in the construction of interior walls and ceilings, is known for its durability, ease of installation, and seamless finish. However, it's not immune to occasional damage like holes, which can disrupt the smooth appearance of your walls. Fortunately, patching and texturing a hole in drywall is a task you can perform yourself with the right tools and techniques. In this step-by-step guide, we will guide you through the process of preparing the damaged area, applying the patch, adding texture, and painting the patched area, making your drywall look as good as new. Whether you are a rookie DIYer or a seasoned pro, this comprehensive guide will arm you with the knowledge and skills to tackle drywall repair confidently.
#1 How To Patch a Hole In Drywall
I. Preparing The Damaged Area
- Safety Precautions
Before starting any home repair project, it's important to prioritize safety. When working with drywall, you'll be handling sharp tools and materials that can cause injury. Therefore, it's crucial to wear protective gear such as gloves, eye protection, and a dust mask.
- Cleaning the Hole
The first step in repairing a hole in drywall is cleaning it thoroughly. Use a drywall saw or utility knife to remove any loose debris around the damaged area. Next, use a damp cloth to wipe away any dust or dirt from the hole and its surrounding area.
- Cutting a Patch
The next step is creating a patch that will fit perfectly into the hole. Measure the dimensions of the hole and transfer them onto a piece of scrap drywall. Use a utility knife or razor blade to cut out the patch, making sure it's slightly larger than the hole for proper coverage.
II. Applying the Patch
- Adhering the Patch
When it comes to adhering the patch, a convenient option is to use a self adhesive mesh patch. These patches are available in various sizes and can be cut to fit over your hole perfectly. The adhesive backing enables easy application - simply peel and stick the patch over the hole, ensuring it is firmly in place. The mesh design allows the joint compound to penetrate through and secure the patch, mitigating the risk of future cracks or holes.
II. Applying The Patch - Step Two
- Adhering the Drywall Patch to the Wall Surface
Apply a thin layer of joint compound around the edges of the hole using a putty knife. Place the patch over the hole and press it firmly into place. Use a second coat of joint compound to cover the patch completely and smooth out any air bubbles or imperfections.
- Sealing a Drywall Patch
To ensure a seamless finish, use drywall tape to cover the joints around the patch. This will prevent cracks and create a smooth surface for texturing. Apply another layer of joint compound over the tape, feathering it out onto the surrounding area for a smooth transition.
III. The Texturing Process
- Introduction to Drywall Texturing
Drywall texture adds dimension and character to your walls, making them more visually appealing. Before getting started, decide on the type of texture you want to apply based on the design and style of your home.
- Tools Required for Texturing
The tools needed for drywall texturing are easily accessible and affordable. These may include a hopper gun, joint compound, spackle, drywall screws, joint tape, spray can of orange peel texture, a trowel or putty knife, and a texture roller or brush.
- Different Texturing Techniques:
- Knockdown Texture: This popular technique involves spraying joint compound onto the wall and then using a trowel to flatten it down. It creates a random pattern of small craters, giving the wall a textured but smooth finish.
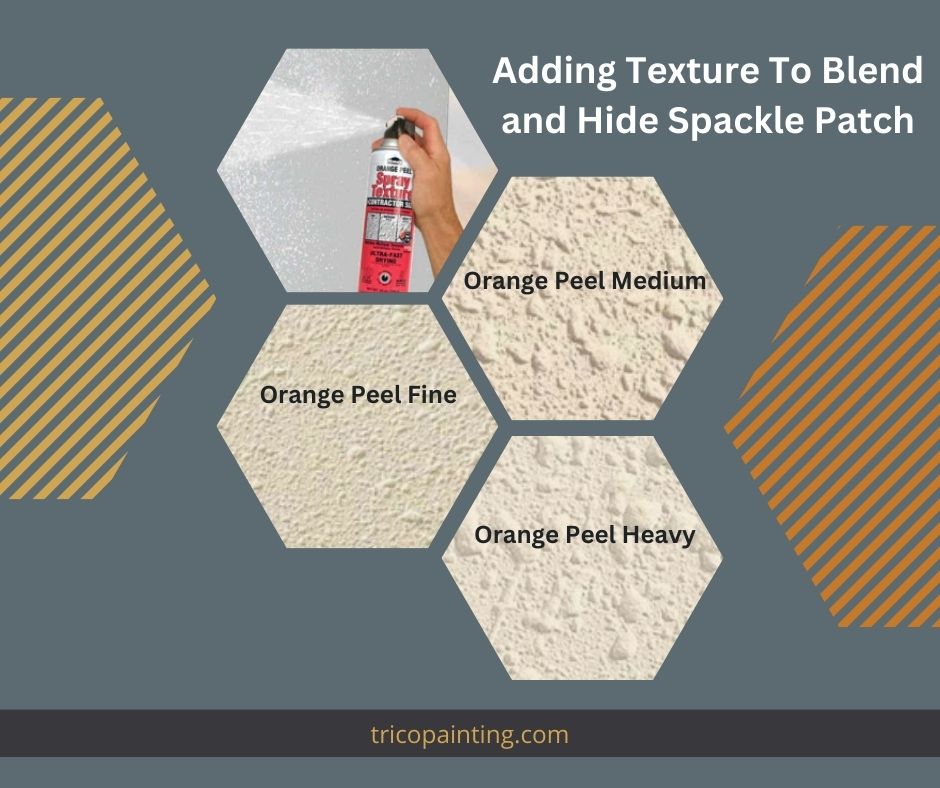
- Orange Peel Texture: As its name suggests, this technique results in a wall that looks like an orange peel. It involves spraying joint compound onto the wall and then using a texture roller or brush to create small bumps.
- Skip Trowel Texture: This technique creates a more uneven and textured finish. It involves using a trowel to apply joint compound in an arcing motion, resulting in a random pattern of small waves.
- Hand-Troweled Texture: This technique is similar to skip trowel but results in a smoother and more refined texture. It involves using a trowel or putty knife to spread joint compound over the wall in a random pattern.

How to apply each texture to the drywall surface:
- Application of Knockdown Texture: Load the hopper gun with joint compound and adjust the nozzle to create small droplets. Spray the wall in a criss-cross pattern, making sure to cover the entire area. Once done, use a trowel to flatten down the texture, creating a knockdown effect.
- Application of Orange Peel Texture (Using Homax Wall Orange Peel Spray Texture): Homax Wall Orange Peel Spray Texture offers a convenient way to achieve the orange peel texture without a hopper gun. Shake the can well before use. Hold the can about 12 to 24 inches away from the wall and spray in a sweeping motion. The adjustable nozzle can be set to any pattern size to match your existing wall texture. Once sprayed, the texture needs to dry for a minimum of 5 hours before priming or painting. Using Homax Wall Orange Peel Spray Texture ensures a consistent and uniform texture that blends seamlessly with the surrounding wall. Make sure to protect surrounding areas from overspray.
- Application of Skip Trowel Texture: Mix your joint compound to a thick, creamy consistency. Using a trowel, scoop up some of the compound and apply it to the wall in a sweeping, arcing motion. Make sure to leave some areas with less texture for a random, uneven pattern.
- Application of Hand-Troweled Texture: Load your trowel or putty knife with joint compound and apply it to the wall, creating random swipes and patterns. Keep the layer thin and smooth, and work in small sections to keep the texture consistent.
IV. Painting the Patched Area
- Priming: Before painting, it's essential to prime the patched area to ensure an even and long-lasting finish. Use a primer specifically designed for drywall and apply it over the patch using a paintbrush or roller.
- Painting: Once the primer has dried, it's time to paint the patched area. Use a high-quality acrylic latex paint and apply it evenly using a roller or brush. You may need multiple coats depending on the color and texture of your walls.
#2 How To Prevent Holes In Drywall
Now that you know how to patch holes in drywall, it's essential to take steps to prevent them from happening in the future. Here are some tips to keep your walls in pristine condition:
- Be cautious when hanging items on the wall, using proper anchors and avoiding excessive weight.
- Avoid using sharp objects near drywall, such as knives or scissors.
- Regularly inspect your walls for any signs of damage and repair them promptly to prevent larger holes from forming.
- Use furniture or rugs to protect your walls from accidental bumps and scratches.
- If you have children or pets, consider installing protective covers on corners and edges of your walls.
Remember that prevention is always better than cure, so taking these precautions can save you time, money, and effort in the long run.
- Check for any plumbing or electrical issues that may be causing damage to your drywall and address them immediately.
- Keep your home's humidity levels in check, as excessive moisture can weaken and damage drywall.
- If you're planning on doing any renovations or repairs that may involve drilling into walls, make sure to use a stud finder to avoid hitting any pipes or wires behind the drywall.
Following these tips will not only prevent holes in your walls but also keep your home looking neat and well-maintained. With the knowledge of patching holes and preventing them, you can now confidently take on any drywall-related tasks with ease. Happy DIY-ing!
#3 Conclusion
Drywall repair may seem like a daunting task, but with the right tools and techniques, it can be a simple and satisfying DIY project. Remember to take your time and follow the steps carefully for a seamless and professional-looking finish. And don't forget to take preventative measures to avoid future holes in your walls. With these skills, you'll be able to tackle any drywall issues that come your way with confidence. So go ahead, patch those holes and give your walls a new lease on life!
Additional Content:
- In addition to the mentioned tools, you may also need sandpaper, a drywall knife, and a ladder for larger patches.
- It's important to use the right type of joint compound for texturing. Ready-mixed joint compound is best for smaller patches, while setting-type joint compound is better for larger areas.
- If you're unsure about the texture of your walls, try experimenting with different techniques on a scrap piece of drywall before applying it to your wall.
- Don't be afraid to get creative and mix different textures for a unique look. For example, combining hand-troweled texture with orange peel can add depth and interest to your walls.
- Lastly, don't forget to protect yourself while working with joint compound and paint by wearing gloves, safety glasses, and a mask.
Frequently Asked Questions:
- How long does it take for drywall compound to dry?
The drying time of joint compound can vary depending on the type and thickness used. Generally, it can take anywhere from 24-48 hours for joint compound to dry completely.
- Can I use spackling paste instead of joint compound?
Spackling paste is typically used for smaller holes and cracks, while joint compound is better suited for larger areas and texturing. It's best to use the recommended product for the specific repair job you are doing.
- Do I need to prime the patched area before painting?
Yes, it's important to prime the patched area to ensure an even and long-lasting paint finish. Primer also helps prevent patches from showing through the paint.
- How do I fix a hole that keeps reappearing?
If a hole keeps reappearing in the same spot, it could be due to structural issues or a recurring issue with plumbing or electrical systems. It's best to consult a professional to identify and fix the root cause of the problem before patching it again.
- Can I use regular paint for drywall repair?
It's recommended to use high-quality acrylic latex paint specifically designed for drywall for the best results. Regular paint may not adhere properly, resulting in an uneven finish.
If you want to learn more about drywall repair and maintenance, here are some helpful resources:
- DIY blogs and websites often have step-by-step guides and tutorials on drywall repair.
- Home improvement stores offer workshops and classes on various DIY projects, including drywall repair.
- YouTube has many informative videos on drywall repair techniques and tips.
- Consider hiring a professional for major or complex drywall repairs to ensure the best results.
Note: When dealing with small or large holes in your drywall, the process of repair can be quite straightforward. The first step involves a drywall patch cut to fit the hole size. For small holes, this patch can be applied directly, whereas to patch large holes, you may need to reinforce the patch with mesh tape to ensure stability. Following the application of the mesh tape, a coating of wall texture spray can be applied to blend the patch with the rest of the wall. The final step involves sanding the area smooth to eliminate any edges or roughness. Once sanded, a lightweight joint compound is spread over the entire patch to ensure a seamless blend with the rest of the wall. This comprehensive process provides a reliable solution to maintaining the aesthetic appeal of your drywall.

