Painting Vinyl Siding: Tips and Tricks
Vinyl siding is a popular choice for many homeowners due to its durability and low maintenance. However, over time, it can start to look faded or outdated. One cost-effective solution to refresh its look is painting. But can you paint vinyl siding? Absolutely. With the right tools, techniques, and paint, you can give your home a fresh, new look. In this article, we'll share essential tips and tricks for painting vinyl siding. From choosing the best paint for vinyl siding to mastering painting techniques, we've got you covered.
Understanding Vinyl Siding and Paint Compatibility
Before you start painting, it's crucial to understand the compatibility between vinyl siding and paint.
Not all paints are suitable for vinyl siding. Some can cause warping due to the heat absorption properties of darker colors.
Selecting the Best Paint for Vinyl Siding
Choosing the right vinyl paint for your vinyl siding is a critical step in the painting process. The best paint for vinyl siding is 100% acrylic. This type of paint is known for its durability and excellent adhesion properties.
Here are some key factors to consider when selecting right paint for your exterior paint job and vinyl siding:
- Durability: The paint should be able to withstand various weather conditions without peeling or fading.
- Color Retention: The paint should maintain its color over time, despite exposure to sunlight and other elements.
- Adhesion: The paint should adhere well to the vinyl siding without chipping or flaking off.
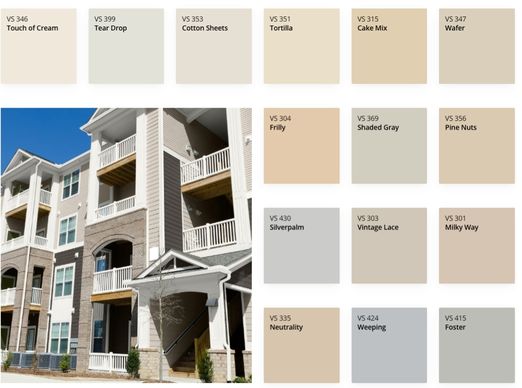
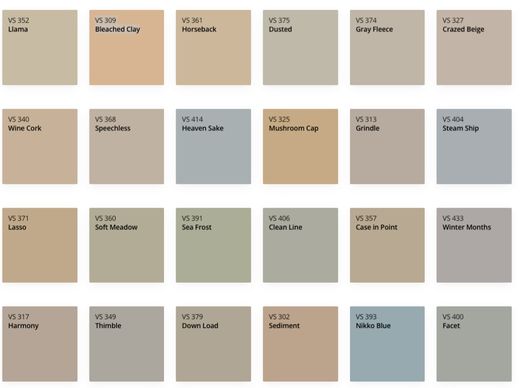
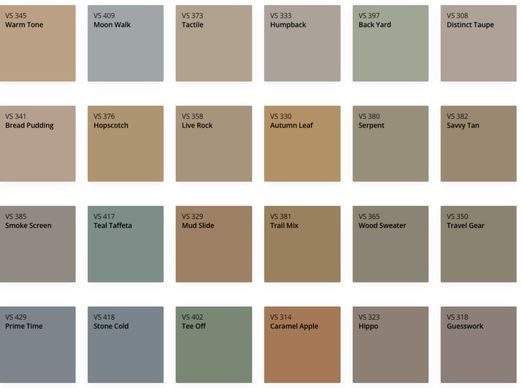
Sherwin Williams Vinyl Safe Colors and Duration for Vinyl Siding

Sherwin Williams offers a range of Vinyl Safe colors specifically designed for vinyl siding. These paints are formulated to prevent warping and other damage that can occur when vinyl siding is painted with darker colors.

Another excellent product from Sherwin Williams is the Duration for Vinyl Siding. This paint is known for its durability and ability to retain its color, making it a popular choice for homeowners painting their vinyl siding.

Preparing Your Vinyl Siding for Painting
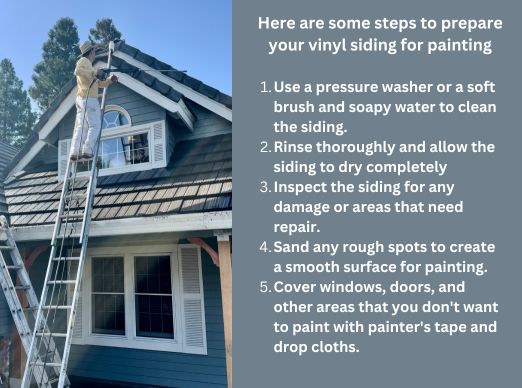
Before you start painting, it's crucial to prepare your vinyl siding properly. This involves cleaning the siding to remove any dirt, mildew, or loose paint. A clean surface ensures better paint adhesion and a smoother finish.
Here are some steps to prepare your vinyl siding for painting:

Remember, thorough preparation is key to achieving professional-looking results when painting vinyl siding.
Checking the Weather: Ideal Conditions for Exterior Painting
When planning to paint your vinyl siding, it's important to consider the weather. Ideal conditions for exterior painting are mild, dry days with temperatures between 50 and 90 degrees Fahrenheit.
High humidity or extreme temperatures can affect the drying process and the overall finish. Always check the weather forecast before starting your painting project to ensure optimal conditions.
Applying Primer: When and Why It's Necessary
Primer plays a crucial role in the painting process. It helps the paint adhere better to the surface, providing a smooth base for the topcoat.
However, it's not always necessary to use a primer when painting vinyl siding. If the siding is in good condition and the new paint is similar in color to the old one, you can skip this step. Always check the paint manufacturer's instructions to make sure.
Painting Techniques for Vinyl Siding
Painting vinyl siding requires a specific technique to ensure a smooth, even finish. Start by applying the paint in a vertical direction, following the length of the siding. This helps to prevent streaks and drips, giving a more professional look.
Use a high-quality brush or roller for the application. A brush is ideal for smaller areas and edges, while a roller can cover larger areas more quickly. For the best results, apply the paint in thin, even layers.
Here are some additional tips to keep in mind:
- Always start painting from the top and work your way down.
- Avoid painting in direct sunlight as it can cause the paint to dry too quickly, leading to uneven coverage.
- Take your time and don't rush the process. Patience is key to achieving a professional-looking finish.
The Importance of Multiple Thin Coats
When painting vinyl siding, it's crucial to apply multiple thin coats rather than one thick one. This approach allows the paint to adhere better and dry more evenly, reducing the risk of drips or streaks.
Moreover, multiple thin coats provide a more durable finish that can withstand weather conditions better. It may take a bit more time, but the result is a professional-looking, long-lasting paint job that enhances the curb appeal of your home.
Addressing Hard-to-Reach Areas and Maintaining Consistency
Painting vinyl siding involves dealing with hard-to-reach areas. These include corners, under eaves, and around windows. Using a smaller brush or a paint sprayer can make this task easier.
Maintaining consistency is also key. Ensure that the paint is applied evenly across all areas. This prevents color inconsistencies and gives your siding a uniform, professional look.
Post-Painting: Maintenance and Care for Vinyl Siding
After painting, proper maintenance is crucial to extend the life of your vinyl siding. Regular cleaning with mild soap and water can help keep the paint looking fresh and vibrant.
Additionally, inspect the siding annually for any signs of peeling or chipping. Promptly address these issues to prevent further damage. This will keep your vinyl siding looking its best for years to come.
Common Questions and Concerns About Painting Vinyl Siding
Many homeowners have questions about painting vinyl siding. These often revolve around warranties, repainting frequency, and the choice between DIY and professional services.
Can I Paint Vinyl Siding Without Voiding the Warranty?
Yes, you can paint vinyl siding without voiding the warranty. However, it's essential to use vinyl-safe paint and follow the manufacturer's instructions to maintain the warranty.
How Often Should Exterior Vinyl Siding Be Repainted?
Typically, vinyl siding should be repainted every 7-10 years. This can vary based on the quality of the paint used and the local climate.
DIY Painting vs. Hiring Professionals: What to Consider
When deciding between DIY and hiring professionals, consider your skill level, the time you can dedicate to the project, and your budget. Professionals may offer a higher quality finish, but DIY can be more cost-effective.
Replacing Vinyl Siding: A Step-by-Step Guide
Replacing vinyl siding is a significant but manageable home improvement project that can vastly enhance the exterior appearance and durability of your home. Whether you're replacing damaged panels, updating the look of your home, or increasing energy efficiency, it's essential to approach the task methodically.
Step 1: Assess the Condition of Your Existing Siding
Before replacing your vinyl siding, thoroughly inspect the existing siding to identify areas that need replacement. Look for signs of damage such as cracks, warping, or discoloration. Assessing the condition will help you determine the scope of the project and the materials needed.
Step 2: Gather Your Materials and Tools
Having the right tools and materials on hand is crucial for a smooth replacement process. Here’s a list of what you might need:
- New vinyl siding panels
- Pry bar
- Utility knife
- Hammer and nails or a nail gun
- Measuring tape
- Level
- Safety gear (gloves, goggles, and a dust mask)
Step 3: Remove the Old Siding
Begin by removing the damaged or old siding. Use a pry bar to carefully loosen and remove the panels from the bottom up, taking care not to damage the underlying structure. Dispose of the old siding according to local regulations.
Step 4: Prepare the Surface
Once the old siding is removed, inspect the underlayment or sheathing. Repair any damage and ensure the surface is smooth and clean before installing new siding. Installing a moisture barrier or house wrap can provide additional protection against the elements.
Step 5: Install the New Siding
Start by installing the new siding panels at the bottom of the wall, ensuring they are level. Nail the siding panels into place, but avoid nailing too tightly to allow for expansion and contraction with temperature changes. Continue installing the panels in this manner, overlapping them as needed.
Step 6: Finishing Touches
Once all the new siding is installed, add any necessary trim pieces and caulk any gaps to ensure a weatherproof seal. Finally, give your new vinyl siding a fresh coat of paint to complete the transformation.
By following these tips and techniques, you can successfully paint or replace your vinyl siding, giving your home an updated and refreshed look. Remember to prioritize proper maintenance to keep your investment looking its best for years to come.
Conclusion: Achieving Professional Results with DIY Efforts
With the right tools, paint, and techniques, you can achieve professional results when painting vinyl siding. It requires patience, attention to detail, and a willingness to learn.
Remember, the key to a successful paint job is preparation. Invest time in understanding your materials and the process, and you'll be rewarded with a beautiful, long-lasting finish.
When painting siding, don’t forget about curb appeal when choosing the paint color. Use an airless paint sprayer for a quality paint job, especially with dark colors and acrylic paint. Hire a professional painter to apply a second coat on vinyl siding, using a soft-bristled brush for the best results.

